Photoshop

Focus Stacking Pink Lady’s Slippers in 2022 by Todd Henson

Pink Lady’s Slipper (2022). This photo is the result of focus stacking 9 images to try to capture a significant portion of the bloom in focus.

One of the goals I had this season was to create a nice closeup photograph of one of our local orchids, the pink lady’s slipper, with an uncluttered out of focus background but showing a maximum amount of the blossom in focus. In the past I’ve tried this by experimenting with apertures to try to balance the amount of the blossom in focus against the amount of the background that’s out of focus. It’s been a challenge with many of the flowers I’ve found locally as they so often grow in very busy and brushy areas. So this year I decided to try using the focus stacking technique to accomplish my goal. This is a technique I’ve only rarely used, so I’m not an expert and am still learning.

Technique: Focus Stacking

Focus stacking refers to making many photographs of the same subject, one right after the other, while shifting the focus point for each photograph. In this case I used a very wide open aperture to keep the background nicely blurred. Then I focused on the closest point on the flower and made an image. Then I shifted the focus back just a little and made another photo, and repeated this until I was focused on the back of the flower. Essentially, each photo has a slice of the subject in focus and when you combine all of them in software you will, hopefully, get the entire subject in focus.

I’m not going to go into lengthy detail on the specifics of how to do this in software, but at a high level I did the following:

  • Selected all the individual photos in Lightroom and chose to edit as layers in Photoshop.

  • Selected all the layers in Photoshop, then auto-aligned the layers to line them all up correctly in case there was any slight movement between shots.

  • Auto-merged the layers, choosing the focus stacking option, to combine them all letting Photoshop pick the areas most in focus from each image.

  • Cropped the final merge to get rid of any inconsistent areas around the edges.

  • Performed any final edits in Lightroom.

The two photos I share today are examples of how I did. They are not perfect merges, though I am reasonably happy with the results. I’m ok with some things being a little out of focus but there are small areas of pink on each flower that I’d hoped would be in focus and are not. At some point I may spend more time on each to see if I might have captured those areas in focus in some of the images but the software just didn’t merge them correctly, and if so I would need to manually adjust the layers after the merge to try to capture those areas in focus. Or it’s also possible I just moved the focus a little too far such that I missed a slice, in which case I’ll need to try again next season.

Another Pink Lady’s Slipper (2022). This photos is the result of focus stacking 14 images, resulting in a 3.01 GB file.

Lessons Learned

  • If you are shooting with a wide open aperture and are close to your subject then adjust the focus in very small increments to assure you capture the entire subject. You can’t always go back and redo this later.

  • Try to pick days where there’s no wind, or at least very little. You don’t want the subject moving between each shot.

  • Use a sturdy tripod. Software can align the photos if they are not all perfectly aligned, but why risk problems? Use a tripod and get the shots as steady and lined up as possible while in the field.

  • Consider what software to use. I used Adobe Lightroom and Photoshop to perform all processing. This is a great combo but sometimes there are third party software packages that might do a better job with specific tasks. I’ve heard good things about Helicon Focus when it comes to focus stacking, but I’ve never tried it.

  • Consider how much memory and processing power this might take. I’m still working from a fairly old computer (12 years old) and this process did tax it. It became so memory constrained at times that the entire process seemed to stall and likely took far longer than it would on a more recent computer (I’ve been recently thinking about finally getting a new one).

  • Consider how much hard drive space this might take. Granted, space is relatively cheap in the scheme of things, but just realize that combining 14 images created on a 20 megapixel camera can result in a 3 GB merged file. If your subject requires even more images then the size will grow even larger.

  • Practice, practice, practice.

Conclusion

Focus stacking is a great technique that can help you create images that surpass the capabilities of whatever camera and lens you own. You can create very shallow depth of field photographs but still capture maximum detail in the specific areas you want. Modern software makes it relatively painless in most cases to create some nice images, but it can still take a little work, and it does help to practice the technique to better your skills and increase the chances of creating a final photo that exceeds your expectations.


Do you enjoy these posts?

Sign up to receive periodic emails with updates and thoughts. Don’t worry, I won’t spam you. And please consider purchasing artwork or products from my online store, and using my affiliate links in the sidebar to the right when shopping online.

I appreciate your support!

Soft Autumn Bliss by Todd Henson

Soft Autumn Bliss

Fall is fading, and with it go the yellows, oranges, and reds of autumn, falling with the leaves of each color. Autumn can have a dream-like quality at times, that transition between the various shades of green to more of a clustering of dark greens interspersed amongst the browns and blacks of bare trunks.

And so I wanted to create an image with a piece of that dream-like quality, something that spoke of the season but in a whimsical way. I was thinking about using one of my Singh-Ray I-Ray infrared filters to help create the softer, more ethereal quality that would shift the image from reality more towards dream. But I didn’t want to lose the beautiful autumn color. So I shot two photographs and combined them in Photoshop.

The first photograph was a natural light image, one in which I was fortunate to capture a special little surprise for those of you who find it. The second photograph was a black and white infrared image created with the Singh-Ray I-Ray 830 infrared filter, which blocks out all visible and ultraviolet light. The filter requires a long exposure time so in addition to the soft infrared glow I might also have had a bit of movement in the leaves when any breeze blew by, further softening the image.

In Adobe Photoshop I overlaid the infrared image atop the natural light image and combined the two, adjusting how much to show of each, finally arriving at the soft colorful look you see. Then I selectively removed the infrared look from specific parts of the image, mostly tree trunks, branches, and that special little surprise I mentioned before.

This is not a style of photography I practice often, leaning more towards the artistic side and using creative license in manipulating the image. But I very much enjoyed the process of visualizing what I’d like to create, thinking through how to do it, heading out into the field and finding a scene that fit the vision, and then playing around in the post-processing sandbox.

I think working on images like this, ones that differ from your usual creations, can be a great way to help ease yourself out of creative slumps. It gives you something new to try, has you thinking and seeing in different ways. And even if the end result isn’t a keeper it can still be a lot of fun and a real learning experience.

Let me know what you think in the comments below. Do you periodically try something completely different than you’re used to? How has that worked for you? And if you don’t do this, give it a try sometime and let me know how it works out.


Examples of Using a Polarizing Filter with Water Lilies by Todd Henson

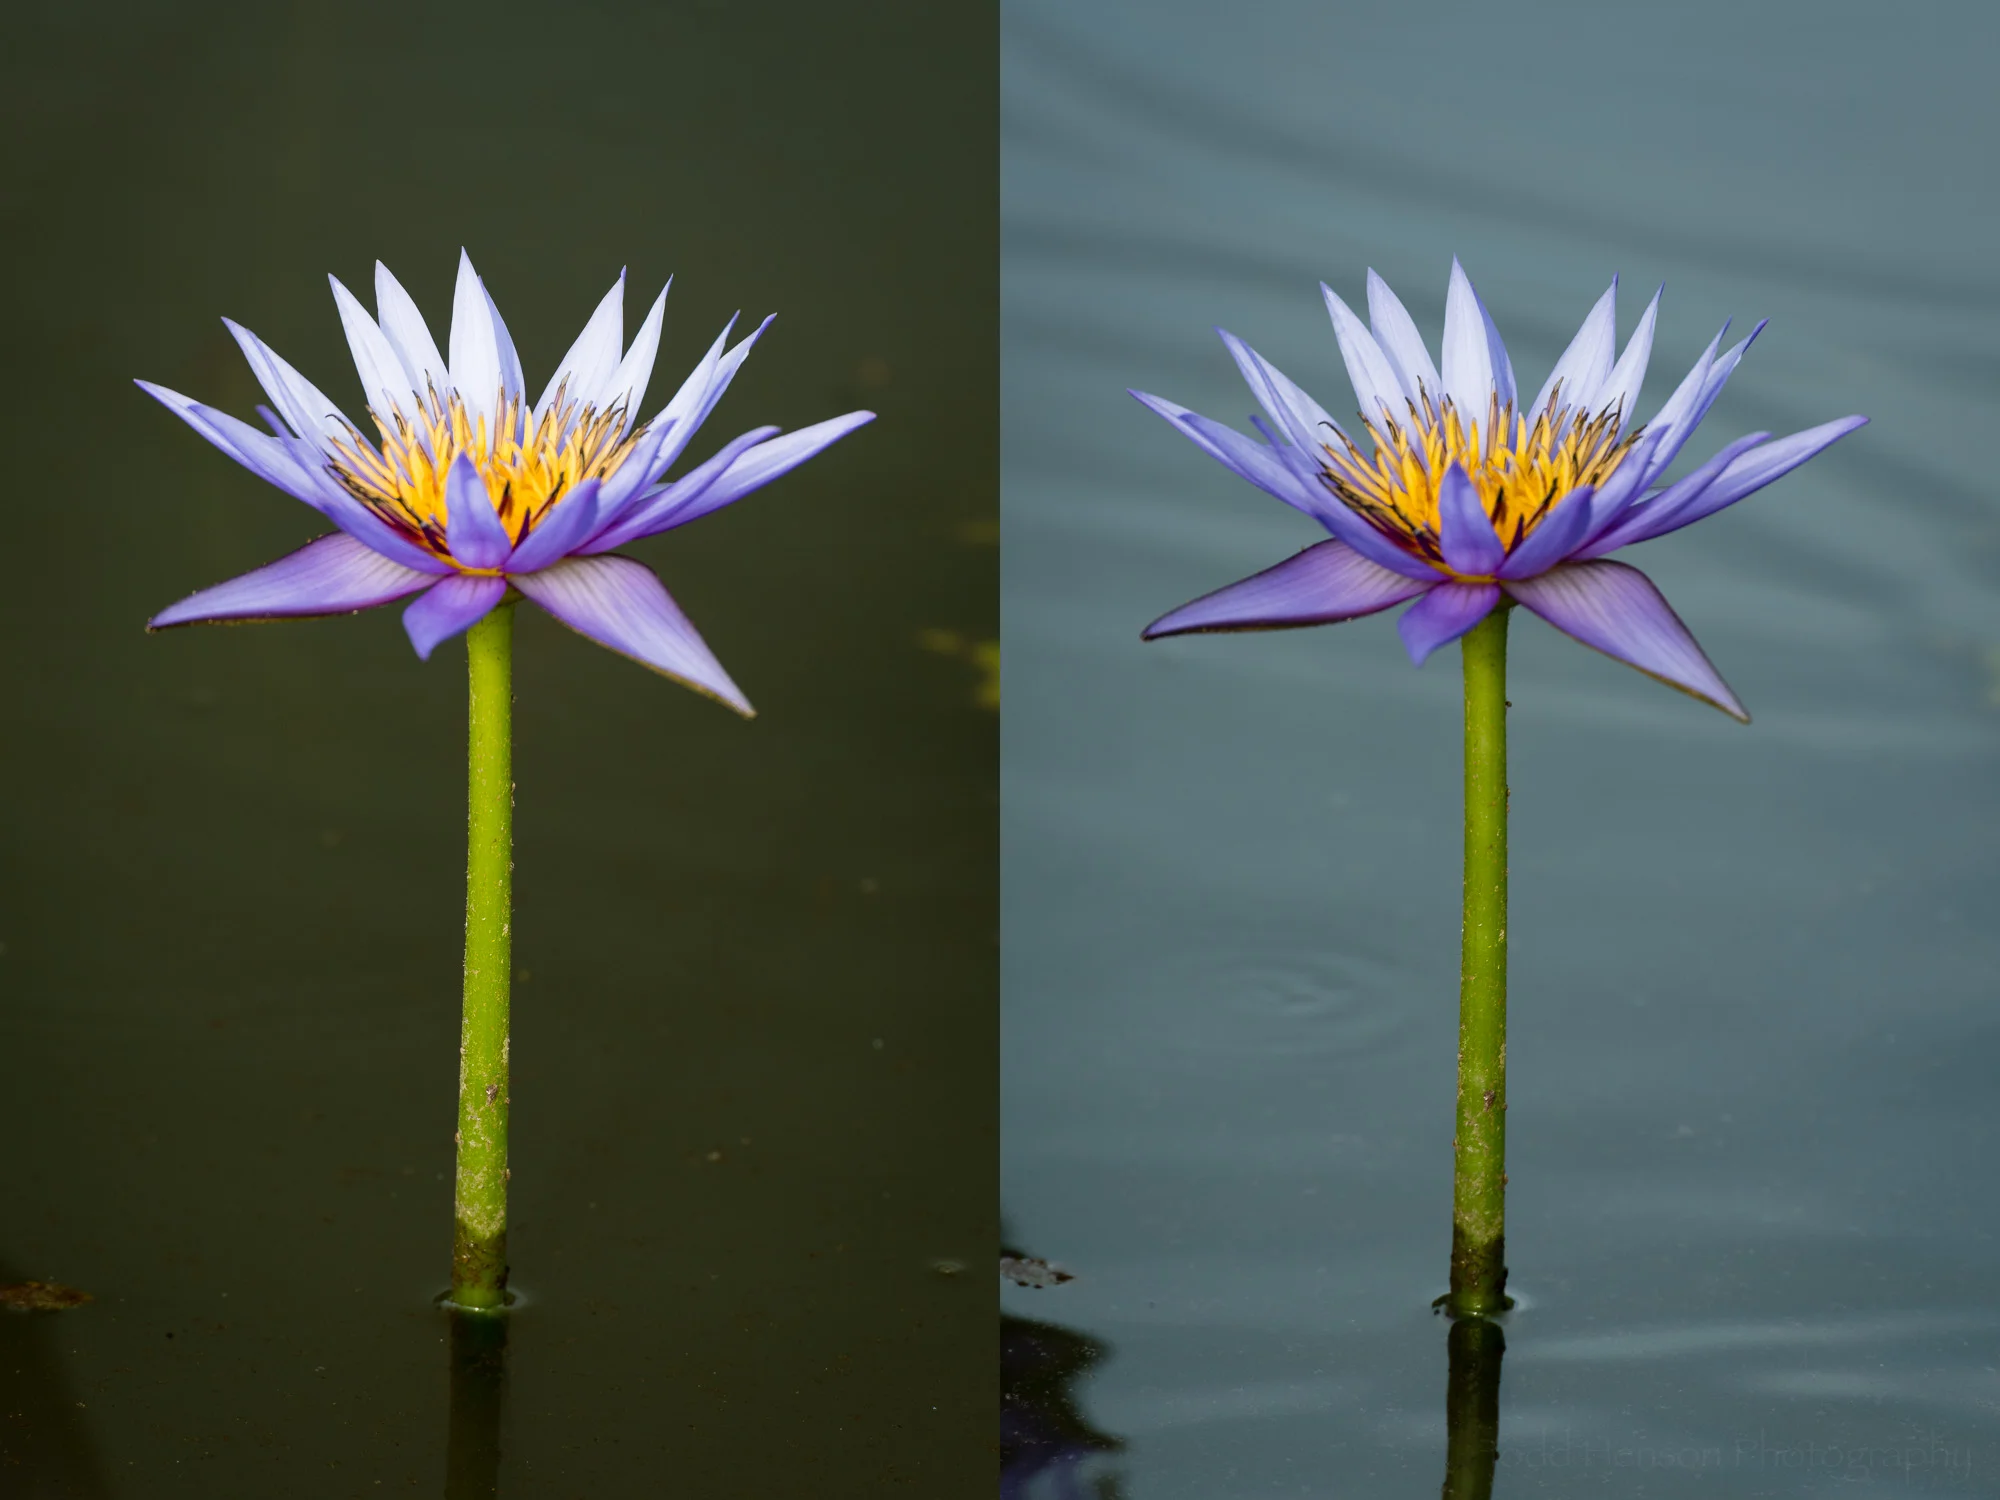
Example showing maximum and minimum effect using a polarizing filter with a purple water lily.

Do you use polarizing filters? I hope to convince you that polarizing filters can help you enhance your photographs. The effects can be dramatic, but they can also be subtle. It’s those subtle differences that can really make a photograph sing.

I don’t want to get too deeply into the technicals of how polarizing filters work. But at a simple level they just control how much polarized light reaches the camera’s sensor. You put the polarizing filter on the front of your lens. You then rotate the filter to control how much polarized light reaches the camera. 

What this means in the real world is that polarizing filters can:

  • reduce reflections and glare on water and other surfaces, such as leaves

  • saturate colors, like the greens of foliage and the colors of flowers

  • darken skies, turning them a deeper blue

  • slightly reduce the amount of light reaching the camera.

Today we’re looking specifically at using a polarizing filter when photographing water lilies. This is great both because it can reduce reflections and glare and will help saturate the colors of the flowers and lily pads. A potential disadvantage is that a polarizing filter does reduce the amount of light reaching the camera, sometimes forcing you to use a slower shutter speed. So watch your shutter speed and if it gets too slow then increase your ISO or open up your aperture.

Purple water lily. Left: maximum effect from polarizing filter. Right: minimum effect from polarizing filter.

As you can see in the first example above, the effect can be dramatic. The purple water lily on the left has the polarizing filter set to full effect, reducing the reflections as much as possible. The same lily is shown on the right with the polarizing filter set to minimum effect, letting us see the reflections.

It’s not necessarily that one photo is better than another. But the polarizing filter lets us control the look of the scene, it lets us control what we emphasize. In this example I prefer the left image where the polarizing filter has reduced the reflections. This darkens the water and helps the water lily pop off the surface. I also like the brighter tones of the green stem.

Pair of Arc-en-Ciel water lilies. Left: maximum effect from polarizing filter. Right: minimum effect from polarizing filter.

In the second example, of a pair of Arc-en-Ciel water lilies, the effect from the polarizing filter is more subtle. Again, the image on the left is at full effect and the image on the right is at minimum effect. The polarizing filter reduced glare off the water which darkened the water. I like this effect as it helps draw your eyes to the lighter colored flowers. You can see subtle differences in the flowers and lily pads.

Pink water lily. Left: maximum effect from polarizing filter. Right: minimum effect from polarizing filter.

The third example shows how the polarizing filter can affect colors, in particular the greens of the lily pads. The left image is at full effect. It reduces the reflections but does not eliminate them. But notice what it does to the greens of the lily pads.

The left image, with full polarizing effect, has beautiful green lily pads. The right image, with minimum polarizing effect, has lily pads with more blue in them. Which do you prefer? The polarizing filter lets you adjust the effect to serve your own taste.

I decided to take the third example a step further. I prefer the look when the polarizing filter is set to full effect. However, I really like the reflection of the water lily in the water and the polarizing filter tends to reduce this effect.

To deal with this I loaded both images into Adobe Photoshop as separate layers. I chose the fully polarized image as the primary image, then using a layer mask I slowly painted in the reflection from the less polarized image. This gave me the best of both worlds. I have the richer colors of the polarized image and also the more pronounced reflection of the water lily from the less polarized image. It’s a subtle difference, but again, these subtle differences can help enhance your photographs.

Pink water lily with maximum polarizing effect. I like the saturated colors of the green lily pads and the flower.

Pink water lily with minimum polarizing effect. I like the enhanced reflection but not the glare on the lily pads.

Pink water lily composite. Combined the color saturation of the maximum polarization version with the reflection of the minimum polarization version.


Do you enjoy these posts?

Sign up to receive periodic emails with updates and thoughts. Don’t worry, I won’t spam you. And please consider purchasing artwork or products from my online store, and using my affiliate links in the sidebar to the right when shopping online.

I appreciate your support!