panorama

A View From Sky Meadows by Todd Henson

A View From Sky Meadows, January 2022

In mid-January of this year my father and I made the hour or so drive to Sky Meadows, one of the state parks in Virginia. We’d intended to hike some of the trails but after setting off we quickly realized it was far colder than we were comfortable with because of the bitingly strong wind and below freezing temperatures. So we turned around and headed back to the warmth of the car.

Before leaving we drove over to the other side of the park, near the visitor’s center, situated with a view of the valley and the mountains in the distance. It’s a very nice view, one I’m always drawn to, and yet I’ve not created any photographs of it that really work for me. But I did want to share that view with you so you can see it’s potential. And because that day, even around 10:30 am, there was some interesting color in the sky. Makes me wonder what it might be like earlier or later in the day.

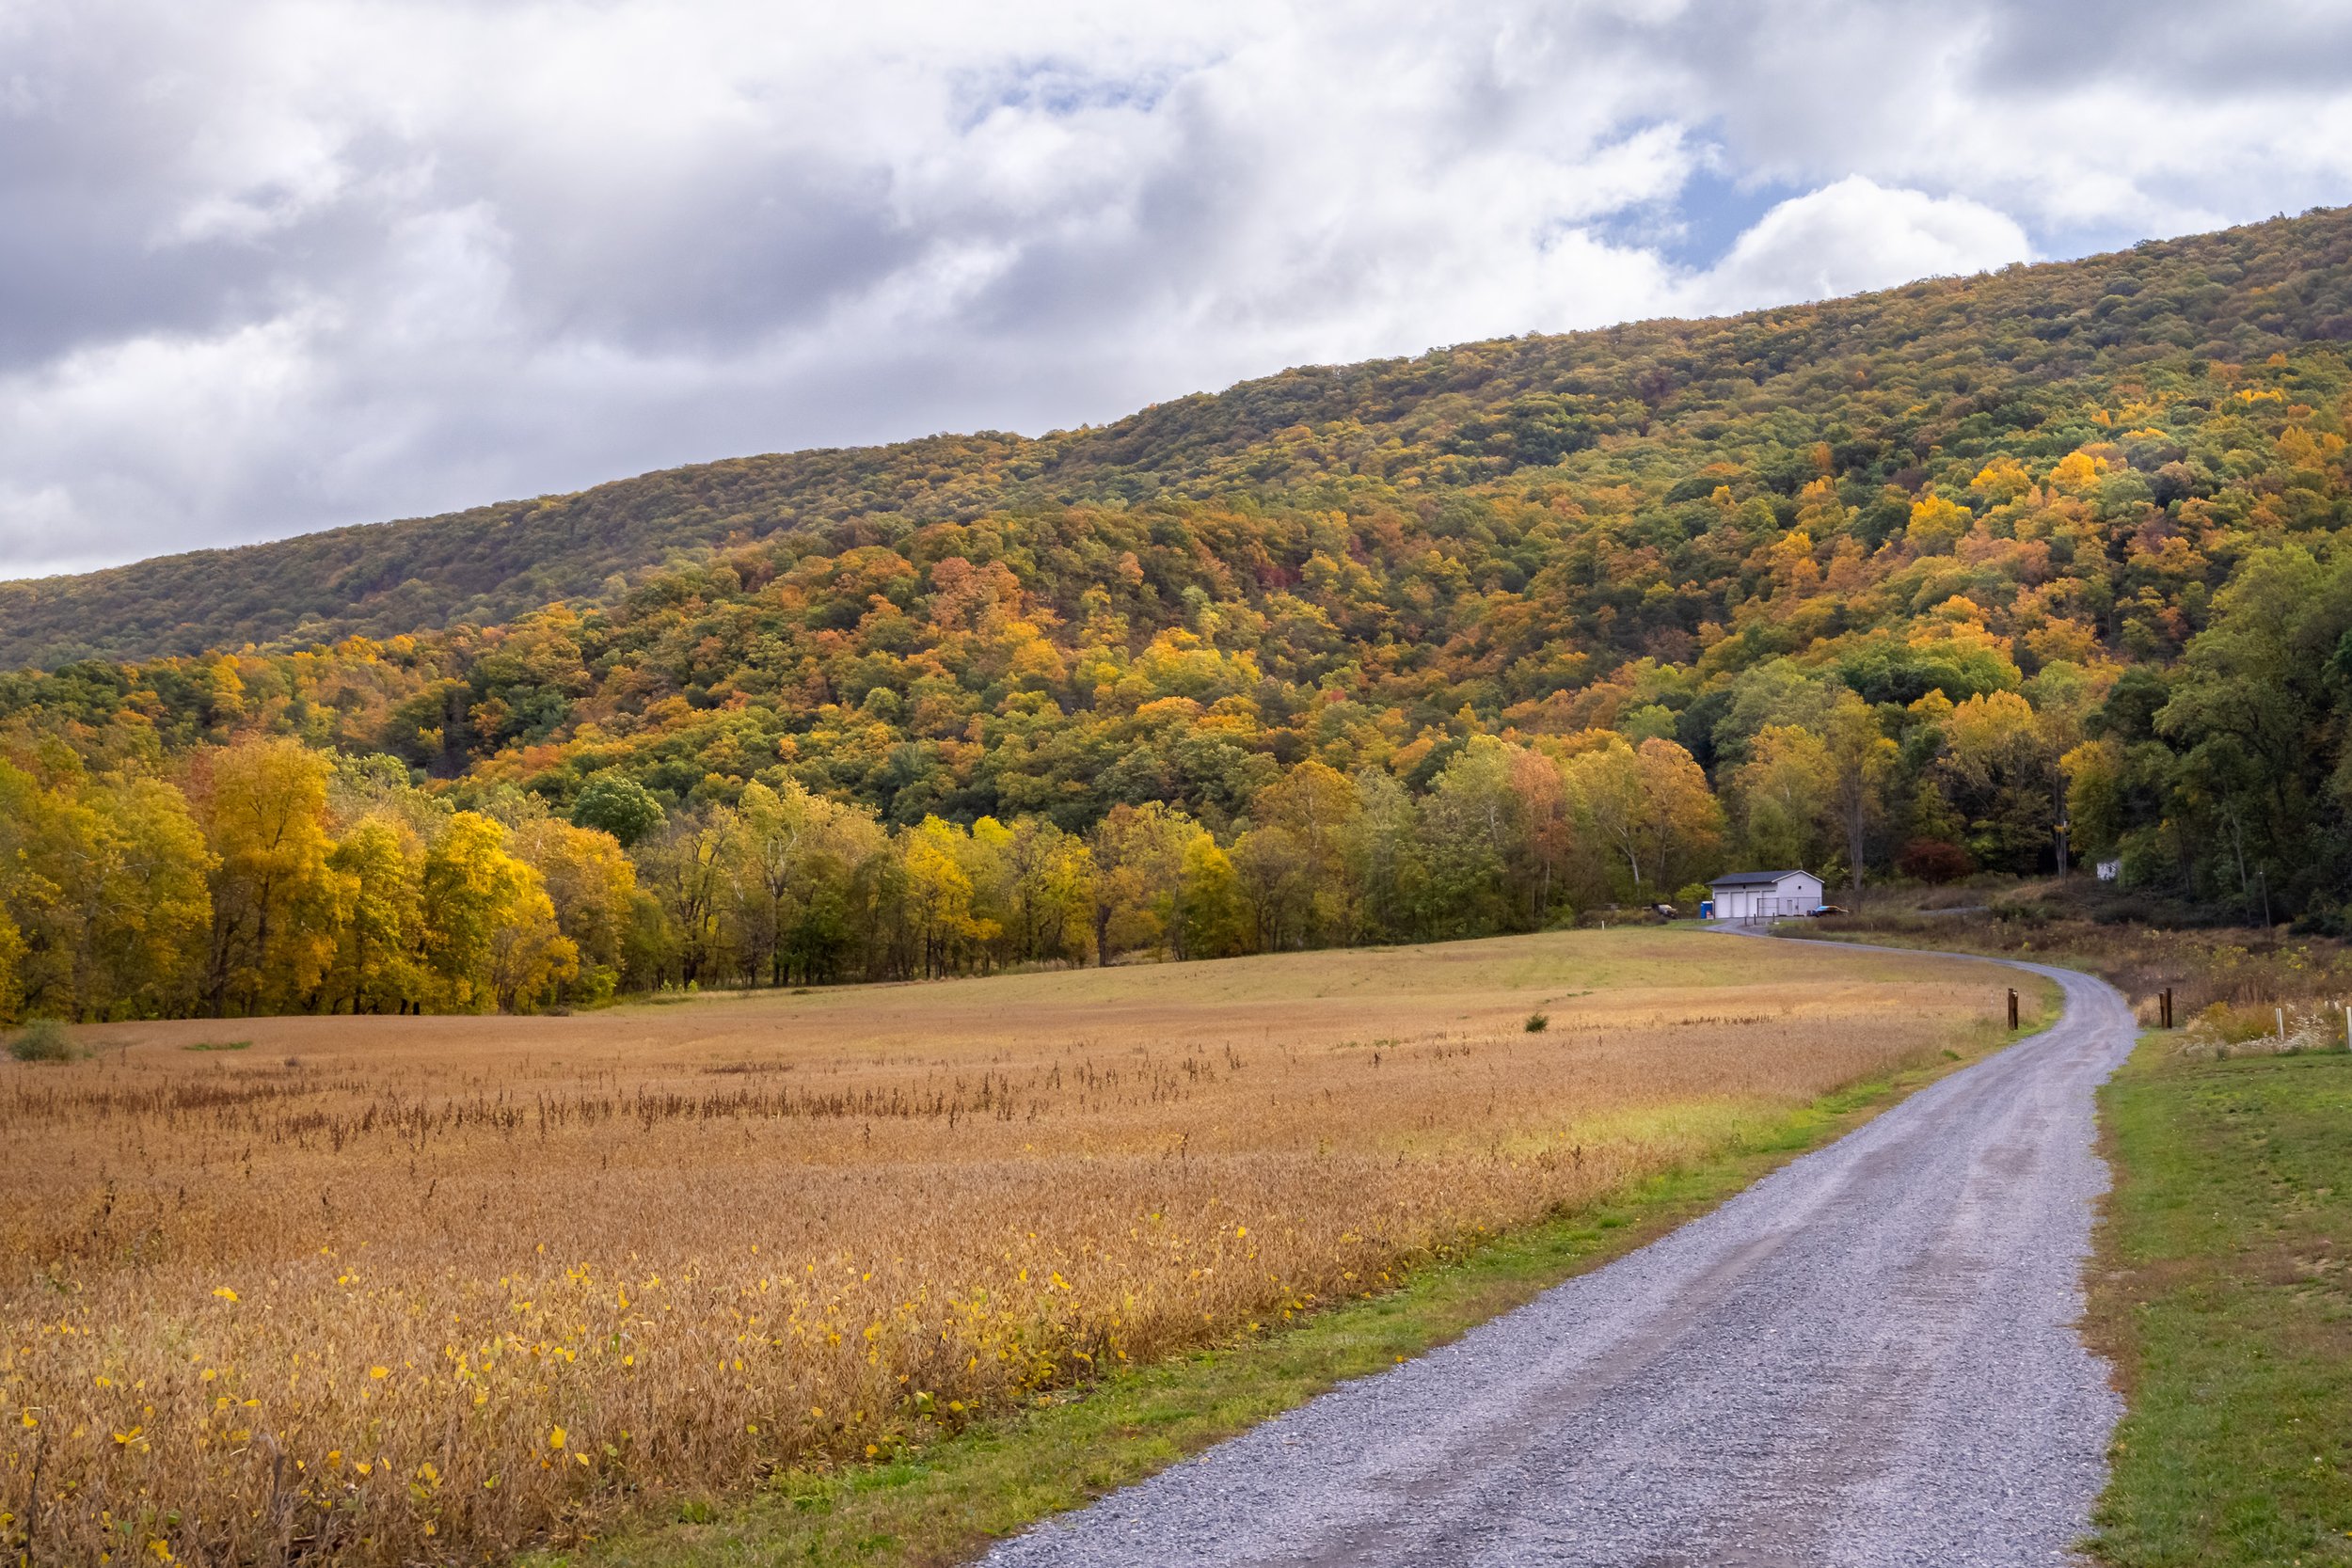
The scene shifts throughout the year. Below is another photo I made of the same scene but from a slightly different location, with a different lens, and at a different time of year. The photo above was made in mid-January, 2022. The photo below was made in early October, 2011. I’d love to see this scene when the foliage changes.

A View From Sky Meadows, October 2011

And to give you an idea of the larger perspective, below is a 10-image stitched panorama of a larger part of the scene from January. You can see there’s still a little bit of snow remaining here and there.

A panoramic view of Sky Meadows, January 2022

Comparing these now I do think I prefer the perspective of the 2011 photo which was created out behind the visitor’s center. The photo from 2022 was created on the road leading to the visitor’s center.


Do you enjoy these posts?

Sign up to receive periodic emails with updates and thoughts. Don’t worry, I won’t spam you. And please consider purchasing artwork or products from my online store, and using my affiliate links in the sidebar to the right when shopping online.

I appreciate your support!


Turn Any Lens Into a Wide Angle Using Stitched Panoramas by Todd Henson

You’re walking around town and you’ve only brought a 50 mm lens. You know this can limit what you photograph, and that can be a good thing, forcing you to think more creatively.

Then you stumble across a great scene that is just too expansive to capture with 50 mm. You don’t have a wide angle lens with you. You can’t move back enough to get everything in the frame. What do you do? Move on, accepting your limitation? Maybe. But perhaps better still is to think more creatively and realize you can use your 50 mm lens to create a stitched panorama of the wide angle scene.

If you’re unfamiliar with stitched panoramas, the idea is to create multiple images, each overlapping the next. When you get home you can use software, such as Adobe Lightroom, Photoshop, or others, to merge all the images together into a finished photograph that captures more of the scene than a single image at that focal length could.

Handheld Stitched Pano Using 3 Images

3 Image stitched panorama of the Washington Monument.

Washington, DC is full of subjects worth photographing. One of these is the Washington Monument on the National Mall. In this case you may be able to move back enough to capture the wider view, but perhaps doing so would alter the perspective too much. If so, try creating a stitched pano as I’ve done here.

The 3 photos that were combined into the final stitched panorama.

You can see in the sample photos I created 3 vertical images. Look closely and you can see each image overlaps a bit with the next image. This is important to give the software enough information to properly stitch them together.

The 3 images in Adobe Lightroom.

I imported the images into Adobe Lightroom and selected all 3. I right-clicked to bring up the menu and chose Photo Merge. From within this I selected Panorama.

Panorama Merge Preview window in Adobe Lightroom.

This brought up the Panorama Merge Preview window, where Lightroom shows a preview of the stitched photo. The first thing you’ll want to do is choose which Projection to use: Spherical, Cylindrical, or Perspective. I won’t get into technical details here because it’s easy to just click on each one and see what effect they have on your photo. I most often use the default Projection Lightroom chooses, but sometimes I find a different one works better.

After you’ve chosen a Projection, notice how there is some white space around the edges of the photo. This is because I was handholding the camera and didn’t perfectly line everything up. This can also happen when using a tripod, but it will happen more often when you handhold. It’s not a problem, though.

Lightroom’s Boundary Warp control set to the full amount.

Notice the Boundary Warp control. It starts off with a value of 0, meaning no boundary warp. If you slide the control towards the right you will see the image begin to warp, removing the white space. Effectively, Lightroom is stretching parts of the photo to make it fit into the image space without the white space. This can distort parts of the photograph, but that’s not a problem with some photographs, those without a lot of straight lines or objects where you’d notice the change.

Lightroom’s Auto Crop option.

If you don’t want to use Boundary Warp because of how it distorts your image, you will need to crop the image to remove the excess white space. Lightroom has a checkbox called Auto Crop that will perform the crop for you. Just check the box and it automatically crops the image. Of course, you can always leave this box unchecked and manually crop the image yourself later.

When you’re finished click the Merge button, then sit back and wait for Lightroom to merge all the photographs into a single image. Once this is done you can make adjustments to the image as you usually do, adjusting exposure, color balance, contrast, and what not. Lightroom makes this entire process very easy.

Handheld Stitched Pano Using 4 Images

4 Image stitched panorama of the National Museum of African American History and Culture.

In this example I created a 4 image panorama using the same steps mentioned above. However, this scene included moving cars. I present it here to show what you may see from Lightroom when there is something moving in your scene. Note, there are more advanced techniques to take care of these things, but I want to present just the basics, to show how quickly and easily you can create your own panos

The 4 photos that were combined into the final stitched panorama. Notice the locations of the cars, some of which move from frame to frame.

In this scene there were a couple vehicles close to me that were moving, which appeared in multiple frames. There was also a red taxi in the background that moved from frame to frame. I used default settings in Lightroom and it produced the final image you saw above. Notice how it chose only one version of the foreground cars, but it actually shows 2 versions of the red taxi. We see the same car twice in the final image.

So be aware of moving objects. They can complicate creating a stitched pano, unless you’re ok with how the software chooses what to show, or you use more advanced techniques/software to manually decide what to show.

Handheld Multi-level Stitched Pano Using 6 Images

6 Image multi-level stitched panorama of the Smithsonian Castle.

In the 2 examples above I held the camera vertically to create a longer horizontal image. In this example I want to show that you can also create multi-level panos. In this case I chose to hold the camera horizontally, but you could also hold it vertically.

The 6 photos that were combined into the final stitched panorama. Lightroom is capable of handling multiple levels when creating a larger panorama. Notice some are even titled, as I was hand holding.

I started by taking a photograph of the upper left of the Smithsonian Castle. Then I panned to the right to photograph the upper middle of the building, and finally the upper right, each time overlapping some with the previous image. Then I moved the camera back to where I started on the left, but photographed the lower left of the building being sure to overlap some with the portion I’d photographed above. Then I panned to the right to photograph the lower middle, and finally the lower right. This created 6 images.

Please note, this isn’t a great photograph. It wasn’t the right time of day to photograph this scene, as the sun was above and behind this scene, which washed out the sky. But I wanted to capture the scene, and I wasn’t going to be there at a good time, so I did the best I could with the gear and skills I had at the time.

Once again, I imported everything into Lightroom, selected the 6 photos, worked through the options on the Panorama Merge Preview window, then made my usual adjustments after Lightroom had created the stitched pano. As you can see in the final image, the sky is still washed out, but I’m pleased I was able to capture the entirety of the building, something I just couldn’t do with my 56 mm lens.

In The Field

Ok, so hopefully I’ve convinced you stitched panos can be another great tool in your bag. If so it’s time to get out there and try creating some of your own. But before you do, here are some tips to make your life, and Lightroom’s, a little easier.

  • Take all of your camera’s exposure settings out of auto. Manually choose the white balance, aperture and shutter speed. The reason is you don’t want these settings changing from frame to frame, something that would make it more difficult to merge them into a single photo.

  • Set the camera to manual focus mode and focus on whatever is most important to you. The key is you don’t want the camera autofocusing on each frame as it can result in different things being in focus in different frames, which can make stitching more difficult.

  • If it’s a very wide scene you may have to compromise on your exposure settings. One side of the scene may be much darker than another side. In that case expose for the part of the scene that is most important to you, generally something in the middle range, and let the rest fall where it may.

  • Use a tripod if you have it. This will make it easier to line things up and keep the camera steady, reducing the amount you have to crop out later.

  • Use a bubble level if you have it, or a digital level in the camera if yours has one. This will help you keep things level and lined up.

  • If you don’t have a tripod, don’t worry. You can still hand hold your camera. All the photos in this post were handheld. Try to hold your camera as steady as you can. Face the middle of the scene, then pivot your body towards the left. Steady yourself. Line it up as well as you can. Create your first image. Then slowly pivot your body towards the right, making sure the next image overlaps the previous image by a decent amount. Stop moving, steady yourself, take the next image. Keep repeating this, pivoting towards the right between each image. Always be sure to steady yourself before clicking the shutter button. You don’t want your movement to create a blurry image.

That’s the basics of what you need to know. You can use almost any kind of camera to do this. In fact, many cell phones have apps that will automatically create a longer pano image as you pan the phone across the scene.

So head out there and give it a try. Let me know how it goes, and pass on any tips you have.


Do you enjoy these posts?

Sign up to receive periodic emails with updates and thoughts. Don’t worry, I won’t spam you. And please consider purchasing artwork or products from my online store, and using my affiliate links in the sidebar to the right when shopping online.

I appreciate your support!


First Attempts at Photographing Action Sequence Panoramas by Todd Henson

A 4 scene action sequence panorama. This is the equivalent of an 11 megapixel image.

After watching and photographing world class kayakers paddling Great Falls on the Potomac River I wondered if I could assemble any of the images I’d created into a single action sequence image, showing the athlete at various positions all in the same photograph. I hadn’t exactly shot with this end goal in mind, so I wasn’t sure if it would work.

If I had planned for it I might have used a wider angle lens and locked the camera down on the tripod. I would have used a small enough aperture to capture the entire course in focus. Then I would have simply clicked the shutter every so often as the athlete maneuvered downriver. I could have merged these into a single image in Photoshop with minimal difficulty because each image would be of the same part of the scene and the only change from image to image would be the moving subject.

But I didn’t plan ahead this time. I didn’t use a wide angle lens. And I didn’t lock my camera down on the tripod. I used a long telephoto with a large aperture and panned with the kayak. This meant I wasn’t going to create the standard sort of action sequence, but instead an action sequence panorama, where the camera moves between images.

The images below were used to create the stitched action sequence panorama above:

George Lepp wrote a great article about this in 2011 at Outdoor Photographer magazine. Unfortunately the article is no longer freely available online, but in it he shows how to create panoramas with the subject moving parallel to him such that the depth of field remains consistent so he can use large apertures and still easily merge the photos in Photoshop.

A 5 scene action sequence panorama. This is the equivalent of a 19 megapixel image.

Unfortunately, in my case the subject was moving towards me. This caused problems with depth of field when stitching the photos together. The shallow depth of field shifted towards me as I followed the kayaker. I think there are likely ways to make this work in Photoshop.

An 8 scene action sequence panorama. This is the equivalent of a 37 megapixel image.

Another issue I ran into due to my lack of planning was not knowing if I had enough of the course captured in the images to create a larger multi-frame panorama of the scene. And as it turned out, in at least one of these sequences I hadn’t captured enough. So I tried using Photoshop’s Content Aware features to manufacture the missing pieces. It did a reasonable job in some cases and a not-so-reasonable job in others. But I present them all here for you to see. It gives an idea of some of the capabilities and limitations of that tool. I do believe a more skilled user could make better use of these features, so I keep practicing and learning. I encourage you to do the same.

One feature, or side effect, of creating stitched panorama images, wether they be standard stitched panos or these action sequence panos, is a potential increase in the size of the image. Stitching many photos together can increase the total number of pixels in the image, even when overlapping images to assist the software during the stitching process. These were all shot with an 11 megapixel camera, and you can see in the descriptions the end results varied from 11 to 37 megapixels. More megapixels can be good if you want to create a large print, or it can be bad if you’re limited in hard drive space and computer processing power. But it’s important to realize doing this can result in some very large image files.

A 10 scene action sequence panorama. I didn’t capture enough of the scene to correctly create the final image.

Because I was missing parts of the scene I attempted to use Photoshop to “create” the missing parts. This shows both good and bad examples of Photoshop’s Content Aware Fill feature. This is equivalent to a 26 megapixel image.

Have you ever attempted action sequence panoramas? If not, give them a try, and let me know about your experiences.


Do you enjoy these posts?

Sign up to receive periodic emails with updates and thoughts. Don’t worry, I won’t spam you. And please consider purchasing artwork or products from my online store, and using my affiliate links in the sidebar to the right when shopping online.

I appreciate your support!